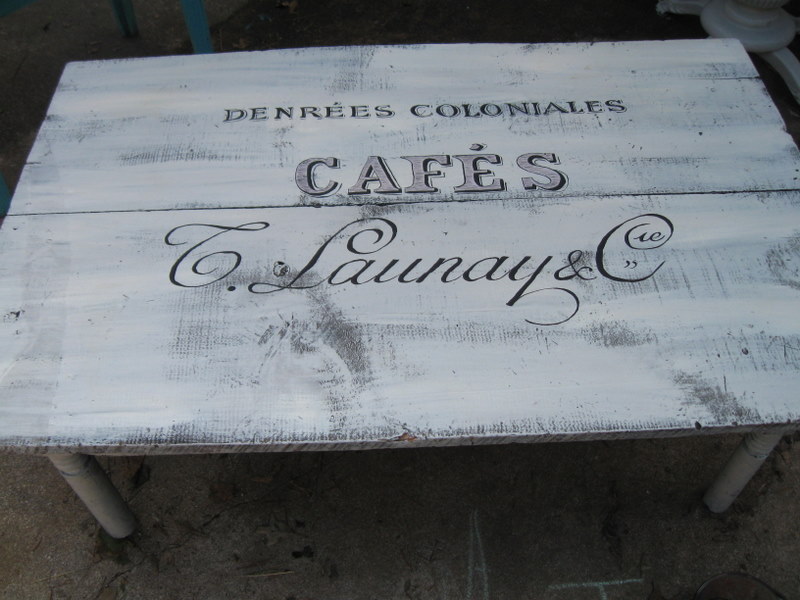
Hi guys! This is a (sort of ) tutorial on some tables I painted yesterday. My husband and I got them this weekend at an estate sale. They were cheap and pretty pitiful but had possibilities. The smaller on was oak and had been left out to the elements for quite awhile..very greige. The bigger table was a cooler primitive one with a wide old 2 board top. Unfortunately the legs were really rotted on the bottoms and were 4 different lengths so I chose to turn this into a coffee table. I measured and Ed cut ..still 4 different lengths! Ed measured and re-cut..3 different lengths but close. I nailed an old pop bottle cap (soda to some folks..coke to the Southerners) to the bottom of the shorter legs for a shim..one took one and one took 2 layered..and viola..nice and steady, no wobbles. I had a helper in the form of my 3 yr old grandson Hunter who loves to help Nina paint....oh goodie! LOL. He is so cute tho' I can't say no..and he is so bossy, "no" is not an option!

This is the big table once I got the legs even. There was dirt/grunge. I DID NOT sand it, I just brushed the dust off and painted.

I did sort of a bad white washy dry brushy coat thinking it was just going to be the base coat, but I like it and stopped there. I used some latex wall paint tinted a bit with craft paint. I am big on using whatever I have on hand!

I got some graphics from the Graphics Fairy and exported them to my good old Print Shop program. Print Shop costs like $20 bucks and it is really basic so I can figure it out. I would love Photo Shop or the ilk someday, but I am not ready yet to shell out $600+ bucks and then have to take a course to figure out how to use it! I printed this as a tall banner..I just printed the left side (top row of words) on the first 3 squares(pages) of the 6 square (page) banner and the center (Cafe) on the last 3 squares (pages), and did another banner for the right side bottom row of words (still 3 squares)and pieced and taped it back together! You could make this up to 6 sheets of regular printer paper wide. When I was trying to decide how big of a graphic I wanted, I just laid 3 sheets of paper (end to end) on the top of my table and decided that was as big as I wanted it...4 would have probably fit too.

Of course I didn't have any transfer paper and Hobby Lobby is an 80 mile round trip away, so I just did a pencil rub transfer. Just color the back of the printout heavily with pencil where the graphics are..you should be able to see them through the paper or you can tape it to a window and do it. Center and tape it to your piece (right side up..pencil side down) and firmly trace the graphic with a pen. Remove the paper and lightly pencil in any faint areas so you can see them. I just trace the outlines, I don't "fill in" anything. Ready to paint!

I sat on my 9 yr old's yoga ball on the carport and painted away. I decided the concrete was going to be a bit uncomfy! You obviously want to start at the top and work down so you don't smear anything with your arm. (Learned that the hard way!) My palette is a foam plate. I just used a skinny brush and craft paint..it went pretty fast. It is not perfect, but I think that adds to the hand painted charm! (that's my theory anyways and I'm sticking to it!)

I outlined the "Cafe" and let it dry, did a pale lavender wash..let it dry and painted the texture lines. Craft paint dries pretty fast.

I lightly sanded everything and sanded heavier on the edges and legs and anywhere it would naturally have wear. It was hard to sand that lettering I just did, but it really does look more authentic sanded than freshly painted.

I painted on crackle medium (wood glue with water thinned to a cream consistancy) let it dry then varnished with water based varnish and let that dry.I antiqued it with some water thinned dark grey brown craft paint that I mixed up in a shade I refer to as "grunge". I just paint some on and spread it about with a wet baby wipe. I do a smallish area at a time and go back immediately with a clean baby wipe and wipe it back to where I want it. I really just want a tiny hint of color and more down in the varnish crackles. I figured this out on my own by painting furniture (and having baby wipes always around!).I fly speckled it a tiny bit with thinned black/brown paint and let that dry. I waxed it with wood paste wax that I had tinted with a small bit of brown paste wax shoe polish (Kiwi) I just swiped my rag across the polish tin a couple times, scooped some wax and applied. After it dries you just buff it off and you are done.

This was the small oak table and the small helper. Again, just dust off, no sanding. I hammered in a couple loose nails and that was it!

I let him paint the top base coat. After he was done , he was happy to go watch toonies and leave the rest to Nina. (I even it up when he is done) He got paint on his belly button!

The base coat was a minty jadeite green latex. I leave some of the original bare wood show here and there.

I covered that with a dry brushy coat of craft paint. I mixed this color from 3 different bottles until it was a color I liked! I let some of the base coat peek through here and there, also I try to not paint over the bare wood I left peek through in the last step.

After crackle, varnish, grunge-ing, speckling, and waxing. I decided against graphics on this one..I liked the beachy cottage color as it was. You can see how much the grunge and tinted wax changes the color. I know this and plan ahead by making my color brighter than I want it to end up. The grunge and wax yellows it down a bit.

Close up of the crackles, grunge and speckles..

The coffee table again. These are going to my booth in Main Street Antiques in Sweetwater (TN).

Leg close up. I do brush off any loose bits before painting When you leave some of the old paint on and don't sand it all off, it just adds to the look. Also if there is lead paint, you are sealing it underneath. Lead paint is something to be aware of with old pieces. This just had a trace of paint left on the legs and I think it was actually milk paint. Generally I would never paint a wonderful primitive piece,( PLEASE DO NOT! I love primitive painted furniture!) but this was in bad shape and the paint was almost gone. I figure if I hadn't bought it to redo, it was headed for the land fill! Hope you picked up some helpful info! Stop on back and see what I am up to next..until then have a great day! Julia

 Hi guys! I have been busy this week. My Etsy shops really picked up lately (yay!) thanks to the new relevancy based search there. I have been listing things and making things and got to a couple cool estate sales again today. I didn't even get to post about the one we went to last weekend yet! Well last weekend I found these wonderful vintage clock faces at an estate sale. I wanted to make them into something so I brainstormed for a couple days and came up with these..and a few more things that are as yet on my "brain-ial" drawingboard. I should jot them down before I forget! These are ornaments I made with photos I took of those clock faces. They are glued to chip board and have glittered edges (of course!)
 I layered a couple images to cover the holes in the middle of some and also, I just liked how it looked! I love the shabby staining on this one! (for those new to my blog I use exclamation points! A LOT!!)
 I covered the backs with vintage French to English dictionary pages because I love text and I picked up a couple new words whilst glueing!
 These turned out with a golden, cream and black color scheme that I am reaaaaally liking!
 I liberated some of my antique mother of pearl buttons from by button jar for these..
 This clock face was amazing..the little inserts behind the numbers was inlaid mother of pearl..so ornate!
 I think this is my fav...most are round but there are a few that were square or otherly shaped. This one had applied metal numerals and just the sweetest shabbiness! I ended up making 31 (!) of these. I hope they sell so I can make more! I thought they would be cute on a tree, wreath or used as decor..I'd hang them from my chandelier!Hoping you are having a great week too! Until next time, Julia