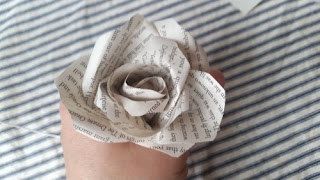
Hi guys! Today I am sharing how I make paper roses. The ones I am showing I am making for my daughter's wedding. They are made with Harry Potter book pages. NOTE: you cannot sell "Harry Potter" anything as it is trademarked, but you can make them for personal use. I have also made these with maps and sheet music. You can use any paper. Scrapbook paper will work but lighter weight works better than heavier weight..less stiffness, but I'd use the kind with images/color on both sides as you will see the reverse.
Remove your page..
Cut into a square ..NOTE I usually cut off that margin of plain paper and then cut my square so I have text all over my petals.
Fold into quarters ..(fold in half and fold in half again
On the NON folded edges, round the corners to a petal shape. I usually have a bit of a dip in the center.
I unfold halfway and put a small snip in the bottom fold for ease of adding the stem later.
I snip in in the "Valleys" about an inch or so to make the petals more individual. Don't cut all the way in to the center.
I pull each petal across a scissor edge from the center out to cup it. Don't pull too hard or you will tear it.
When done it should look like this.
Then I curl the petal outer edges (2 curls per petal) in the same direction as the last step.
When done it should look like this
I crease the petals down the middle with the curled edges to the outside like this
Should look like this when done.
Then I add 2 more creases on each petal one on each side of the center crease.
Here I added pen marks so you can see where the folds are. You do not add pen marks!
Take your floral stem wire (Walmart, Hobby lobby etc) and curl one end around a pencil or skewer or what have you to make a small coil.
Tear a cotton ball in half.
Make a "nest" with your finger to hold the glue.
I use Elmers but any white glue will work. I do NOT advise hot glue..too hot, you will have burns and strings and it is really not necessary and won't work as well.
I stick the coil into the glued cotton ball and twist the end.
Glue the petals like so..curls facing down/on the underside..slide it onto the stem.
Curl a petal around and hold a minute.
Curl the opposite petal up and around the first .
Then do the same with the 2 other petals.
I give the excess paper at the bottom a twist.
Glue up another layer...
And apply the same way doing one petal, then the opposite petal, another petal and the opposite petal.
Hold it a minute or so..
Add another layer of petals.
I try to stagger the petal placement..the middle of a "new" petal in the "valley" of 2 previous petals.
I usually use 3-4 layers depending on how large I want it but you can add more..or use less for a bud or boutonniere sized rose. If you have smaller petals, you will have a smaller rose.
You can "zhugzz" or tweak the petal edges to add more curl or pinch in a fold or tuck a petal with your fingers.You can use them like this or add a calyx and leaves and floral tape. I'll show that step later when I get these to that point.
Ta-Dah! I have been making these for years. The folding and curling really make the flower by adding dimension so do not skip that step! Each one will look a bit different.. just like real roses! Follow me for more of what I am making for my daughters' weddings! Comments loved so I know I am not talking to myself (as usual!) 'Til next time! Julia


