aqua scroll template

Monday, March 30, 2015

Faux grainsack made with Sharpies How To DIY Tutorial


 Hi guys! I have been wanting to make a faux German grainsack for quite awhile..just never got around to it! Why a faux one? Real antique ones cost a LOT. You can buy faux feedsack stencils for $50-$75 a pop...but then you have ONE stencil, albeit a very reusable one. I wanted MY grainsack to be personal. Number 3..my favorite number. Jacob Hardi ..my great grandpa ..Glarus  (Switzerland) where my dad's people came from. My daughter went on Ancestory.com and did the free 2week trial reasearch and traced my dad's family back into the 1500's on his mom's Becker  line in Glarus ..where the Hardie ancestors came from too..just not as good of records for them.(the E got added on the end of Hardie when they came to America) They emigrated to New Glarus Wisconsin and eventually South Dakota where I was born.


 ANYHOO..enough family history..the point is ..I am cheap. I went to Walmart and got these spray bottles  (travel size section for packing hairspray in luggage I guess) for .98 cents each. 2 for dye, one for water.


 Rit dye also Walmart (though they sell it other places and also in powder form) in Camel and Pearl Grey because they seemed like they would get me where I wanted to go. I think $2-$3 per bottle and you will use maybe 2 teaspoons for this project!


 I had a bunch of old washed vintage feedsacks..someone had diligently washed all the lovely old graphics off (boo hoo) but still usable vintage fabric. They used these a lot for dishtowels and quilt backing and even to make underwear! This is a nubby weave 100% cotton. You could use new fabric but I would suggest a 100% cotton with a rough weave or linen (more expensive but more authentic). You can even buy reproduction feedsack yardage online (Google) I wanted to use something cheap in case it didn't work out. An old linen tablecloth would be lots of yardage to play with.


I filled the spray bottle up to the bottom of the sticker with dye and the rest of the way with hot water and then spritzed away. Tan and grey and then plain water. Then rinse and check how it looks and if you want it darker, carry on with the spritzing. It gives a mottled grey look. Rinse well and then I tossed mine in the dryer.You can really dye these however light or dark you want. If after drying you want it darker..dye some more! I advise wearing an old apron and be aware of your dye overspray..don't ruin anything!


 I have Print Shop which is an ancient simple computer program to make cards, labels, photo projects etc. that costs like $20 (I got mine at Staples) but you may already have something that works to generate text. I looked at fonts and chose CloisterBlackBT as the one I liked. I made the page set on wide (sideways) and used the Headline maker because that makes a lot larger letters. I printed it out on a LASER PRINTER in reverse because I wanted to use a blender pen. (I got all my blender pen info offline) That did NOT work. My toner may be too light or the pen may have been the wrong one So I tried using acetone instead of blender pen..nope..very very light. So I gave up on blender pen and reprinted it the "right way" and tried graphite transfer..No go..my fabric was too dark and nubby. So I tried carbon paper..Nope..At this point I was on Plan D or E and getting determined (bullheaded) to make it work. (Since the blender pen didn't work, you could print this on whatever printer you have. No printer or program? Check your library for books on lettering and fonts and freehand your own..more work but still do-able)


 The blender pen lightened the ink but that was about it!


 Graphite transfer aka rub the reverse with a pencil and trace the front..works on light colors and painted projects..not this one!


 The blender pen that did NOT work..the only one my Hobby Lobby had..the ones I saw online were black..maybe the wrong brand?


 SO I used some small scissors and snipped out the edges of the letters. The fancy bits you have to freehand back in. You could use a exacto knife to cut them out..but of course I could not find mine. I cut them in strips so I could space them however  wanted.


These are the Sharpies I used, fine line and chisel. I pinned the paper where I wanted and outlined the edge only in the fine line Sharpie. Then I removed the paper and referring to an extra copy of the
lettering to see how they were supposed to look. I added in lines with the fine line Sharpie to make a hollow letter and filled it in with the chisel Sharpie. NOTE I used a light hand and moved quickly with the tip. Leaving the tip too long on the fabric will cause it to bleed..quick and light. The letters should look less than solidly filled in anyways to have an aged look. 


 Out line your "empty" areas in the fancier letters first with the fine tip and remember NOT to fill them in!
 I pretty much free handed the vine. I looked around the kitchen for a bowl or plate large enough to trace around (pizza pan) I traced a pencil semi circle and then went over it with the fine marker (and didn't follow the line on one part and had to draw another. I just buried the wrong line in the leaves and said..oh well..handmade charm!

 Double line area..you can see I held the marker longer here in places and there are some bleeds or fuzzy edges..which I am ok with! Actual antique ink could have bled a bit too! You could cut your stencil in stencil plastic if you want a reusable one or want to use stencil or fabric paint instead of Sharpie. This one I can reuse a few more times..just not for paint. Freezer paper would also make a good paint stencil. Check online for freezer paper stencil tutorials and go. I just used the chisel Sharpie and made leaf shapes..up one side and matching ones down the other. Practice on a piece of paper first until you get the hang of it!

 For my first try I love how it turned out..maybe a bit wonky on the vine, but still good!


Plus it is my personal info. I plan to search out my ancestors for more cool names and places of origin. This will eventually be a pillow! So..hope I gave you some ideas! Stop in again and follow me if you please! Til next time! Julia

Wednesday, March 25, 2015

Spring has sprung!

 
 Hi guys! Spring has sprung in East Tennessee. The daffodils and forsythia bushes are blooming. People are giving their lawns the first mow (and I am driving by with my window down sniffing). The trees are budding and leafing out in a haze of pink, white, and new leaf green.

 
 I was taking this pic with my phone and I never noticed it was a bit out of focus..oh well..still pretty yellow! It has been in the 70's and gorgeous the last couple days. This Saturday is supposed to be 24 degrees with 3 inches of snow! My mind refuses to wrap itself around that!

 
Not too long until peony season! This is an older pic of some paper  peonies I made with coffee filters.. the cheerful yellow vintage McCoy pottery vase just seemed to "go" with this post. Despite the impending doom of this weekend, I am enjoying the beauty of the here and now. The sunrise was gorgeous this morning as I took Jack to school (and my camera and phone both forgot at home) and I have had 3 days of NOT having to towel off 8 muddy paws every time the pooches go in and out..and out and in, and out and in, and out and in...sheesh. Hope you are taking time to enjoy the here and now! Til next time, Julia

Monday, March 23, 2015

Hardware store art supply..wood veneer edging


Just a quickie today! I was wandering through Lowe's with my husband this weekend and found a new art supply to play with! I like to use non traditional items in new ways and this looks like fun. It is white birch veneer tape..meant to finish edges of cabinet doors etc. It is actual wood. It is iron on and at $6.58 for 25 feet of it..lots to play with. 


 I figured I could stain it, dye it with markers or alcohol inks or even ink pads, stamp it, cut it. I am thinking of trying photo transfers on it..hmmm..


It is glued to iron on, but I think you could also just glue it on. I found out this comes in other woods and widths and also unglued through furniture refinishing places. I wonder if you could run it through a punch? Maybe stamp it with metal stamps? So many ideas, so little time! I'll let you see what I come up with. Til next time! Julia

Sunday, March 15, 2015

More weekend vintage finds McCoy pottery


 Hi guys! These were my favorite finds of the weekend..vintage McCoy pottery in my fav color, aqua!


The little one in the front is Nelson McCoy and the oldest of the 4. The zig zag one in back is staying with me!

 I got these 2 vintage pale blue velvet smocked pillows because they remind me of my gramma..she always had decorative pillows like this on her bed. The other 2 were money well spent. Our 12 yr old son Jack came estate sale-ing with me on Saturday. I picked up the shabby brass urn and he asked, "What's that?" I said, "An urn..(pause) or a henweigh." He asked, "What's a henweigh?" and I said, "Oh about 3 pounds!" The older man behind him started giggling and I was laughing..took Jack a second to get the (very old) joke. We stopped in an antique mall after the sale and I got the tin bundt pan for $1 to snip up for one of my projects. Again he asked, "What's that?" I said, " A bundt pan (actually a jello mold or dense fruitcake pan) He thought I said "butt pan" and he continued "cracking butt jokes" (see what I did there) through the rest of the mall while I did my momma from My Big Fat Greek Wedding impersonation.. eets a bahnt pan..eet is kehk!..LOL..we got $10 of fun out of the $1 pan..

 Which meant the perfectly shabby aqua chair must be free because it cost $10! (Daisy nosing in the pic as usual) M mom had an old chair like this on her porch for years..not this perfectly shabby aqua though!

And today was the official first day of wine on the deck for 2015! There are daffodils blooming here but they are in my down the road neighbor's yard and I didn't want to trespass to get a pic! Maybe I'll find some closer to the road this week! 'Til next time! Julia P.S. Sutter Home moscato..Yellow Tail has a fab one too!

Saturday, March 14, 2015

Vintage weekend booty Vintage keys and more

 
Hi guys! I went out vintage hunting Friday and Saturday this week. Up at 5 and out the door at 6 to drive an hour (or more) to get to sale an hour early..to find they opened up and hour and 15 minutes early and to see the only 2 pieces I was interested in walking off down the street! BUMMER! I HATE when they open early ( and I am not there yet LOL) Oh well..the beautiful Blenko decanters went home with A Perfectly Nice Man who was very happy to get them and he told me for $20 each (at this point I loudly exclaimed DAMMIT! and he laughed)..one was worth $200+ and the other around $100. Boo! Sale 2 I stood in the rain for a half hour only to find I should have gotten a line number and I had to be #65. It was a barn of rusty stuff and so many people I got a bit freaked. Not that I am anti rusty stuff..just wasn't what I was looking for and more than I usually pay. On the up side I only spent $15. On the down side an extra 80 miles round trip and a half hour in the rain and I only spent $15! Sale 3 was much better and saved my day. Today I drove 150 mile round trip to Georgia for a sale and bought 1000 vintage keys from a key maker's estate.

 
It was dark and rainy all the way there..I hate driving in that so I was a bit tense! I got a lot of skeleton keys and picked flat keys for their rust, size and jewelry making possibilities! I like the ones with the hearts at the top.

 
I am generally not an owl lover, but this 1970 linen calendar was so cool and in great shape..probably will make it into a pillow or tote.

 
                                                         More keys!

 
This was a little wooden girl (so sweet) an old treen (wood) box and a cedar heart shaped box... I am a sucker for hearts!

 
Shabby baby shoes. These need to be stuffed an primped up a bit.

 
3 cool thick restaurantware coffee cups and 3 Harlequin Homer Laughlin coffee cups...pretty green!

 
A 6 sided pie tin like my mom's I will be keeping, a brown bottle and cookie and biscuit cutters

 
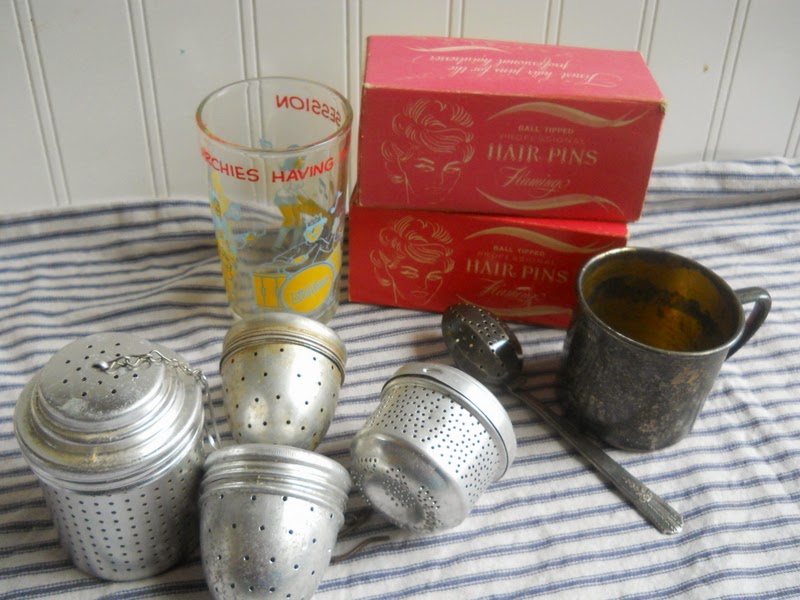
Tea strainer balls I want to make into altered dolls (bodies)  2 old boxes of bobby pins, an Archies comic glass, an engraved silverplate baby cup and a cool tea infuser teaspoon.

 
Too cool..how useful is that for a quick cup of tea? That may stay with me)

 
Crocheted lace collars and bits because apparently my already ridiculous stash is not enough, black glass necklace, vintage gloves that actually fit my man sized hands and a spool of gold metallic thread for 50 cents because the spool I bought 2 weeks ago at JoAnn's was almost $4!

 
The pin was missing some stones but still pretty. The clothespins are marked West Germany.

 
This unopened tobacco sample I got because it was 50 cents and it looked interesting..there is one on Ebay for over $50 right now! (this one is still in its waxed paper wrapper and apparently from 1927,

 
Ballet toe shoes..I have a hard time finding these!

 
German plates..their trademark was from 1928-32.

 
I got a bunch of coral pieces because they were well priced.

 
An abalone shell an 2 quartz stones (these may stay with me)

 
Brown bottle, Japan ink (?) bottle and flower frogs.

 
A cool tudor style front porch light..

 
A shabby folk art horse..great for the wall.

 
An Italian frame, a nice old frame with a Mary Cassatt print an 2 French books for text fodder.

 
This is a skirt hem marker..but how cool for paper towels, toilet paper, or balls of string!

 
Last (that I took pix of) some vintage metallic trim that will go nicely with the Indian sari borders I bought last month for "projects"! Whew... I need a nap. Hope you had a fruitful weekend too! Til next time! Julia