Hi guys! We are doing an antique/vintage show this weekend in Clinton, TN..the Clinch River Fall Antique show http://clinchriverfallfestival.com/. They also have a spring show. I wanted something "seasonal" to mix in with our vintage and antiques. Orange pumpkins are not really my cup of tea and I wanted something more permanent to sell. I wanted white with black script and I had made faux grain sack before so I thought WTH..let's try that! (You could use any fabric )
I haven't finished the stems and leaves yet, but I wanted to share what I had finished so far.
Only one side of the pumpkin has graphics, but you could put them all over..or even use rubber stamps and a permanent inkpad. You could use any fonts. graphics, sayings or even black and white line illustrations (check The Graphics Fairy online).
I used names from my family tree. Here I picked a favorite number 3, my great great grandpa's name (Jacob Hardi) the village in Switzerland he was from (in Glarus) and a random old number.
I used vintage 5 pound sugar sacks but any cotton muslin would work. I used the bags that had some rust marks and aged them further by spritzing lightly with mini travel hairspray squirt/spray bottles (the kind from the travel section of Walmart/Kmart etc that you use to fill and take on an airplane) that I filled with brown and gray Rit Dye. A few light spritzes and I put them in a 9x13 cake pan and covered them with strong hot coffee for a couple minutes. I rang them out and rinsed them in the sink under the faucet and ran them through the dryer with a dark towel (in case there was dye transfer) I wanted the grungy but not super dark (my personal choice).
I picked a antique-y calligraph-y looking font and printed it out on my laser printer in reverse (has to be a laser printer to work and has to be printed in reverse). I use Print Shop a cheap ($20 then at Staples) 2008 version and use the headline maker to get bigger letters.
I used Citrasolv concentrated cleaner to make the transfer. I am lucky that they sell it in my local grocery store, but I think you can also get it online (Amazon).
I wetted a cottonball ..not super wet with the Citrasolv... I taped the print face down with packing tape over my fabric at the top edge catching the edge of the paper, fabric and the board I had underneath. Don't tape over the graphics.
Then a wipe or 2 of the Citrasolv..NOTE too much will give you a blurry transfer. I only worked on one "line" at a time and worked the first name, then the second. It just works better that way..the letters blur less and the Citrasolv doesn't dry before you get to transfer everything.
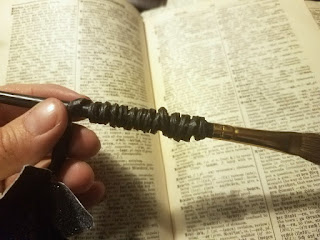
I rubbed firmly with the edge of a spoon..I went over it all well 3-4 times and up and down seems to wiggle the paper less than side to side. Make sure you go over every bit firmly.
It also helps to hold the paper above and below the area you are rubbing. Again, I only taped it at the top with packing tape catching paper, fabric and some of the board I had underneath (NOTE do not do this on a NICE tabletop!! Use something underneath like a piece of scrapwood or a plastic protector...save your table top!
Here I peeked to make sure I had hit everything.(don't untape the top edge) You can carefully relay the paper and rub more if you need to.
Here is the whole transfer..this one says New Glarus for where they ended up..New Glarus, Wisconsin. (This was my other great grandpa's name) I probably have distant relatives still there.. I need to visit one of these days!
I decided to make it look sectioned with jute twine. Buy this from the hardware section..it is cheaper than the same stuff in the craft section!
I held the end between my thumb and index finger and wrapped it around my elbow 3 times. (Approx 16-18"?)
You should have 6 strings. I tied a knot in one end and clipped the loops on the other end.
My bags varied from 7-8 inches wide and 12-14 inches long. If you are using new fabric, cut a rectangle approx. 7 x 14 and fold it in half and sew the 2 sides shut to make an open topped bag (before doing the transfer)Turn right side out, transfer the graphics then I let it dry overnight to let the excess Citrasolv dry but a couple hours should work. I just didn't want anything smearing. Turn inside out and center the knot in the middle of the bottom edge and loosely gather/bunch the sides to the middle.
Tie it off with a rubber band under the knot.
Turn right side out..
and stuff about 2/3's full with fiberfill. NOTE I find it much cheaper to buy a new $2-$3 fiberfill pillow than a $6-$8 bag of fiberfill! Snip it open at the top seam and use the fluff.
Space the twines around the pumpkin where you want and add another rubberband around the extra fabric and twines like a pumpkin ponytail.
Fiddle the twines into place where you want them and give each one a pull to tighten and indent. Part 2 will be finishing the stem and adding leaves..stop back!