aqua scroll template

Wednesday, October 30, 2013

Upcycled tart tin Christmas ornaments Folk


Hi guys! This is what I have been working on this week! I really like working with vintage tin. I started a couple years ago whe I bought a box that contained a stash of vintage tin can lids and some partially made vintage tin can Christmas ornaments..and off I went. Vintage tin cans were actually tin and much shinier than new "tin cans". This ornament is a fav..I like the folk art vibe.


 The next year I used the tops and bottoms of my grandson's powdered baby formula cans..shiny metal. Last year I used vintage tart tins..and this year vintage brass light fixture pieces! I always have an eye out for vintage metal that I can repurpose. This one has a vintage Christmas light reflector incorporated and a vintage earring center. They all have vintage and antique crystal chandelier prisms on the bottom..love those!


                                       This year quite a few have a religious style.


                                        But some are more 'holiday neutral"..


                            These are star or snowflake or flower shaped..I never can decide exactly!


This one has a vintage brass hardware bit and an old single mother of pearl earring..I am hoping the "gold" on this earring is brass and not actually gold!


 I am inspired by antique American folk art motifs, Mexican folk art, icons and religious art.


This one is also a fav..I like the pale colors and the vintage pearl beads.


I also used beeswax to seal the images instead of varnish this year. This one has vintage gold mercury glass Christmas beads. I also add tiles of text to some. I believe this one says "adoration".


                                This one is Saint Rose of Lima,but she has a very "Madonna" look.


 I used a lot of old prayer card images..I love vintage prayer cards and buy them when I can.


                                                        I love the shape of this one.....


                     More vintage pearl beads.. they go well with the old brass.


 I love using old vintage things as supplies..it gives you such a unique product and I find it inspirational to have to work with what you have.


                   I like this one too..I embossed a heart into the middle of the tart tin center.It has a very Mexican or Southwest folk art feel.


 This one is simple but also a fav..I love the patina on this one..it looks like an altar item.. not surprising since I am Catholic and loved going through my Grandma's prayer card collection..which was lost in the shuffle of time. I would LOVE to have that and her button tin which I also used to play with and sort through! (Maybe that's why I have such a vintage button "issue"!)


On this one I used an image from The Graphic's Fairy..a Regency era lady. She had a sassy, daring expression so I added the word "daring" to the ornament. This is feathered brass and feathered, colored tart tin.Very Elizabeth and Mr. Darcy..


I also used some images from my stash. This is an Art Deco flapper era lady. I added the words "wishful wonder" to this..2 emotions that as a child, Christmas brought out in me! Next I need be listing vintage in my vintage shop..it is a juggling act! On the homefront, my husband had the week off and has been doing projects around the house. He (finally!) replaced the shower head in my shower..it is fab! No more slow drizzle and having to re enact that North Pole Shower scene from Elf! Hope you have a productive week. We will be trick or treating tomorrow and hoping for no rain..I'll TRY to remember my camera. 'Til next time! Julia

Tuesday, October 22, 2013

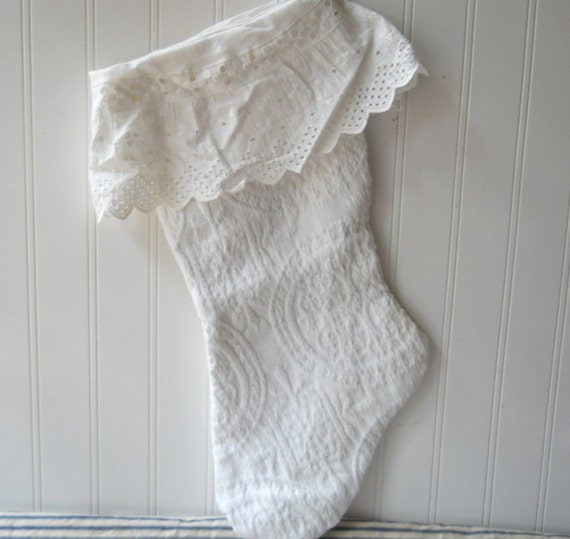
Vintage matelasse and lace Christmas stockings and Chalkware Belsnickle Santa Claus


Hi guys! I have been busy busy lately. I finished up my order of 10 vintage matelasse and lace Christmas stockings and boxed them all up and shipped them...and THEN remembered I hadn't taken any pix to share! Typical! They basically looked like the one of mine above, but with varied laces on the top edges. They are all vintage materials. The stocking is cut from a vintage matelasse bedspread. The laces come from my totes of vintage and antique laces.I used vintage petticoat hems and even some heavy crocheted laces. The insides are vintage white damask tablecloth fabric. I love upcycling old textiles into new items! I need to make a few more for my shop!


 Today I finished up some chalkware Santa Clauses that I have been working on. I mold these from plaster in a vintage tin chocolate mold that I have. They are pretty big..9" tall.


 My mom and dad always say no education is wasted. When I was fairly newly married (as opposed to 31 years under our belts!) my husband and I sold our farm and we and our baby son moved and I went back to school. A totally terrifying series of events at the time..I had planned on being a farmer's wife all my life, but my life had other plans! I went to vo-tech in a dental lab tech program. I worked with plaster, bending wire and casting metal.I did work "in the field" for a few years, but when we moved to TN and I had TWO little kids, daycare took a major chunk of my pay. After I paid daycare and gas, I was making $20 a day so I decided to stay home with my babies. I never got back into dental work, but I have used a LOT of what I learned! With these I found myself using my plaster mixing and mold pouring techniques once again!


 My favorite part of these is the painting. I have painted hundreds of Santas in my former crafty life..and getting back into it is just like riding a bike..with no painful crashes! The term Belsnickle is of German origin. Belnickles are thinner (usually switch carrying) fur clad Nicholas's who show up a week or 2 before Christmas to scare the goodness into small children with their switch and knowledge of who had been naughty!


 I can never make "just" red! In the background you see some of my hoarded *ahem* collected vintage mercury glass bead garland and a couple of my bristle brush trees..one tinted and glittered and one waiting for "the treatment".


              The faces always turn out uniquely...each a bit different. I added vintage mica flakes and glitter to the fur.


I want to make more of these if I have time. This Saturday Ed, (our 5 yr old grandson)Hunter and I got up at 4am and drove (ok..Ed drove..I rode) to South Carolina to an antique auction he had scoped out online. We got some marrrrvelous vintage and antique hardware and lighting bits and more. We packed the van. Poor Hunter had a piece of cardboard surrounding his side to keep things from tumbling on his head! He was so tuckered from being outside at the sale all day running about and playing "acorn basketball" (acorns and a foam cup..low tech!) that he fell asleep instantly in the van. We didn't even get out of town before he was snoring (and it was a small town!)We followed the alternate route home that the GPS suggested and ended up driving through SC, NC,and GA on our way home to TN on wiiiiiindy switchback roads in the dark..I was squeaking and squealing involuntarily at the sharp curves..much to my husband's amusement/annoyance! I dozed off once and he hit the rumble strips on a curve (I think on purpose) and I was shrieking awake once again! Truly there was no "good" way to get there or home..winding roads all the way. I am sure if it was daylight it would have been a much better drive! We made it home safely and I have been unpacking the van for the last couple days. New items for Ebay, Etsy and out booth uptown! Check back and see what goodies I have to share! Hope you have a great week! Til next time! Julia

Tuesday, October 15, 2013

Upcycled Vintage map paper rose boutonnieres


 Hi guys! This was a project I was working on this week.. a custom wedding order.


 These are boutonnieres made from vintage map paper. This map was topographical and very bright...but that is what they wanted to go with their wedding colors, navy and lime. I thought they turned out cool!


 They were from Alabama, so I tinted the map paper for the calyxes and leaves a brighter lime and used mostly an Alabama vintage map page for those.


They shipped today and are on their way! I have another order I am working on for shabby cottage Christmas stockings and I will share that when I get them finished. It has been an absolute crazy house at my home lately. We did an antique show this weekend and sold tons. We loaded the leftovers and all our tables etc. into the truck in 5 minutes! I have never sold so much before. We went to a sale last weekend and bought a ton that I need to clean and list..and handmade things that are screaming for me to finish them. I need more hours in the day! Stop back again and see what I am up to! Til next time..Julia

Thursday, October 3, 2013

Black and White painted and stamped faux pumpkins tutorial

Hi guys! If you read my last post, yes..I forgot to take my camera to the Fall Festival! I am the worst blogger ever! It was really nice, fun, and yummy though! Today I am sharing some pumpkins that I just completed. I am SO slow on the bandwagon that these aren't even going in my Etsy shop, they are just going up to my local booth at Main Street Antiques (Sweetwater TN).Let me say, I am not much of a traditional orange pumpkin gal..but these would mix in with orange pumpkins nicely! I got these faux pumpkins at Walmart..they were about $5 each. You could certainly use real pumpkins, but I wanted something that lasted! If I was using real pumpkins, I would pick some with  flatter sides than these deeply lobed faux ones. These do not lend themselves to writing words on (which I had originally planned to do) I felt the deep ribs would throw off the text too much.


I hand painted these as the weather here lately (rainy) did not let me spray paint them..which would have been quicker. I'd use the spray paint for plastic if I was going that route. These have a coat of gesso and a couple coats of glossy white acrylic paint. If I did it again, I'd do TWO coats of gesso then the two coats of paint. To this one, I freehanded on some chevrons in black acrylic craft paint. I used regular but again, I'd use glossy if I did it again. I added a coat of Mod-Podge when the black paint was dry to make everything glossy. I just started at the top making a shallow V shaped strip on each rib working my way all around. Then I made another series of shallow Vs below the first ring at the width I wanted my chevrons to be. I then filled them in with paint. The I left a white stripe and added another black one working my way down the pumpkin. You could probably use a pencil to mark your chevrons before you paint, but it was just as easy to freehand it.


 For this one I stamped white tissue paper with stamps and StazOn ink. NOTE you want to put something UNDER the tissue paper to block the excess ink or you will be like me with inked shapes all over your dining room table! You cut out the motifs trimming close to the image and glue them on with Mod Podge. I just painted the Mod Podge right were the motif was going, placed it and smoothed over with more Mod Podge.


This one has a free hand painted vining motif...basic but pretty!


  This one has more stamped tissue paper motifs. You could also add text this way. I have had success running tissue paper ( use nice quality or it may tear) through my inkjet printer and printing online motifs, scanned images and computer generated text onto the tissue paper. You have to iron it to a piece of freezer paper cut to the same size as regular printer paper (8.5 x 11). I have found if you iron a regular piece of printer paper to the freezer paper and remove it and re-iron and remove it a couple times, it cuts down on the tackiness of the freezer paper and you can remove your tissue paper easier with less tearing. I have also heard of people using spray adhesive and a piece of transparency film  to add the tissue paper to for the same effect (haven't tried that yet). Play around with it! Stamps are really easy, but somewhat limiting as to what is available to print. Edited to add: You'll need to mist your printed tissue paper with a couple light coats of spray sealer/varnish. I use Krylon matte varnish. It keeps the ink jet motifs from bleeding when Mod Podged..


 I also glued on a few rhinestones for a bit of sparkle..these are the scrapbooking type. As I was making these to sell and didn't want to end up with a $40 pumpkin, I held back a bit. But if you are making these to keep..go wild! Add glitter, rolled paper roses (book page or scrapbook paper) lace, ribbon,feather boa bits, handmade tags..you name it!

I think they turned out pretty cool! Til next time! Julia